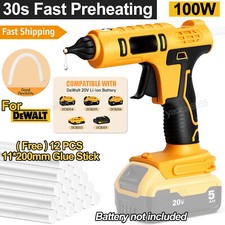
The step-by-step guide “How to load glue sticks into a cordless glue gun” provides concise instructions on how to properly load glue sticks into a cordless glue gun. This guide aims to assist users in understanding the correct procedure for loading glue sticks and ensuring the smooth functioning of their cordless glue gun.
Top-Rated Cordless Glue Guns for Professionals


Gather the necessary materials
- Prepare the cordless glue gun: Prior to beginning your project, locate a cordless glue gun that is suitable for your needs. Ensure that it is in good working condition and has a battery that is fully charged.
- Check the glue stick compatibility: Next, gather the appropriate glue sticks for your cordless glue gun. Verify that the glue sticks are compatible with the gun by checking the packaging or the manufacturer’s instructions.
- Inspect the glue stick condition: Examine the condition of the glue sticks to ensure they are free from any damages or defects. Make sure they are not dried out, broken, or bent, as this may affect their performance and result in an inferior bond.
- Confirm the appropriate size: Double-check that the size of the glue sticks corresponds with the size requirements of your cordless glue gun. Using an incompatible size can lead to issues such as glue leakage or blockages.
By gathering both the cordless glue gun and compatible glue sticks beforehand, and ensuring they are in good condition and proper size, you will be well-prepared to commence your project smoothly and achieve optimal results.


Prepare the glue gun
Ensure that the cordless glue gun is switched off and has cooled down before proceeding. Identify the loading chamber, typically positioned at the back end of the gun, and inspect its specific design and features. For instance, on the XYZ model, the loading chamber is a black cylindrical compartment with a removable cap. Similarly, the ABC model may have a transparent loading chamber with a twist-lock mechanism. Familiarize yourself with these structural elements to efficiently prepare the glue gun for use.
Open the loading chamber
To open the loading chamber, first locate the latch or release mechanism on your cordless glue gun. Slide, twist, or press the designated button, depending on the model. Always refer to the manufacturer’s instructions for safe operation.


Insert the glue stick
To insert the glue stick into the glue gun:
- Take a glue stick.
- Align the glue stick with the nozzle of the gun.
- Push the glue stick firmly until it reaches the back of the loading chamber.
Close the loading chamber
To close the loading chamber after inserting the glue stick, securely latch or lock it. This will prevent the glue stick from falling out during use. Make sure to properly secure the loading chamber before proceeding.


Preheat the glue gun
To preheat the cordless glue gun, turn it on and follow the manufacturer’s instructions. Allow a few minutes for the gun to heat up, ensuring that the glue stick inside melts and dispenses smoothly. This step is crucial in preparing the glue gun for use and ensuring proper adhesive application.
Test the glue flow
- Step 1: Squeeze the trigger of the glue gun.
- Step 2: Observe the flow of glue from the nozzle.
- Step 3: Check for any blockages or irregularities in the glue flow.
- Step 4: If the glue flows smoothly without any issues, the loading process is successful.
For example:
- Squeeze the trigger of the glue gun firmly.
- Watch closely as the glue starts flowing from the nozzle.
- If you notice any clumps or interruptions in the glue flow, there may be a blockage that needs to be cleared.
- Ensure that the glue flows continuously and evenly for a reliable application.
Reload when necessary
To reload the cordless glue gun, follow these steps:
- Release the trigger: Remove your finger from the trigger to stop the glue flow.
- Wait for cooling: Allow the glue gun to cool down for a few minutes to prevent any burns or accidents.
- Remove the empty glue stick: Gently pull out the empty glue stick from the rear of the gun. Dispose of it properly.
- Prepare the new glue stick: Take a new glue stick and unwrap it, removing any packaging materials.
- Slide in the new glue stick: Insert the new glue stick into the rear of the glue gun, making sure it’s aligned with the feeding mechanism.
- Engage the trigger: Press and hold the trigger to start the glue flow. The new glue stick will slowly advance and melt inside the gun.
- Continue using: Once the glue starts flowing smoothly, you are ready to resume your project. Keep the trigger pressed to dispense glue as needed.
Example:Step 3: After finishing a section of your project, release the trigger, and set the glue gun down on a heat-resistant surface to cool. Once it has cooled, simply pull out the empty glue stick from the rear of the gun.
Turn off and store the glue gun
- After finishing with the glue gun, turn off the device and give it sufficient time to cool down before handling it.
- Store the cordless glue gun in a secure location, out of reach of children and pets, until the next time it is needed.
- Ensure that the glue gun is safely stored in a designated area to prevent any accidents or misuse.
Summary of Steps or Final Thoughts
In conclusion, we hope that this blog post has been a helpful resource for those seeking guidance on how to load glue sticks into a cordless glue gun. By following the step-by-step instructions outlined in this guide, users can ensure the proper loading of glue sticks and maximize the performance of their cordless glue gun. Remember to always prioritize safety and read the manufacturer’s instructions for your specific glue gun model. Happy crafting!
Essential Supplies


Pro Tips
A Comprehensive Guide to Using a Hot Glue Gun and Understanding its Key Aspects
Step-by-Step Guide for Using the Cordless Glue Gun Full Size
- Ensure that the cordless glue gun is fully charged before using it. This can usually be done by plugging it into a power source and allowing it to charge for the recommended amount of time specified in the user manual
- Insert a glue stick into the glue gun. Most cordless glue guns have a chamber where the glue stick can be inserted. Make sure the glue stick is properly placed and secure
- Switch on the glue gun by pressing the power button or switch located on the handle. Some models may have indicator lights or display screens to show that the glue gun is turned on
- Allow the glue gun to heat up. It typically takes a few minutes for the glue gun to reach the optimal temperature for melting the glue stick. Keep in mind that different glue gun models may have different heating times, so refer to the user manual for guidance
- Once the glue gun is heated up, squeeze the trigger to dispense the melted glue onto the desired surface. Be cautious as the glue may be hot and can cause burns. Control the amount of glue by adjusting the pressure applied to the trigger
- After use, switch off the glue gun and unplug it from the power source. Allow the glue gun to cool down before storing it safely. Remember to handle the glue gun with care to avoid any accidents or injuries
Frequently Asked Questions about Cordless Glue Guns – Full Size
Does the cordless glue gun come with any additional nozzles or attachments for different application purposes?
Yes, the cordless glue gun typically comes with additional nozzles or attachments for different application purposes. These additional accessories allow users to apply glue in different patterns or to reach difficult-to-access areas. It is important to check the product description or packaging to confirm the specific attachments included with the cordless glue gun, as the availability of additional nozzles or attachments may vary depending on the brand and model.
What is the average battery life of the cordless glue gun when used continuously?
The average battery life of a cordless glue gun when used continuously can vary depending on the specific model and battery capacity. Generally, cordless glue guns with larger battery capacities can last anywhere from 1 to 3 hours of continuous use before needing to be recharged. However, it is important to note that battery life can also be influenced by factors such as the temperature at which the glue gun is being used and the type of glue being used. It is advisable to consult the product manual or contact the manufacturer for specific information regarding the battery life of a particular cordless glue gun model.
Can the cordless glue gun be used while it is being charged?
No, the cordless glue gun cannot be used while it is being charged. Charging the glue gun usually requires connecting it to a power source via a charging cable or dock. During the charging process, the gun’s heating element is typically deactivated to prevent any safety hazards. Therefore, it is important to wait until the glue gun is fully charged before attempting to use it again.
Are replacement parts and accessories readily available for the cordless glue gun?
Yes, replacement parts and accessories are readily available for the cordless glue gun. Most reputable manufacturers of cordless glue guns provide a range of accessories such as different types and sizes of glue sticks, additional nozzles, and spare batteries. Additionally, commonly needed replacement parts like heating elements or trigger mechanisms are also readily available. It is recommended to check with the manufacturer or authorized vendors to ensure the availability of specific replacement parts and accessories for a particular model of cordless glue gun.